

Penetration testing requirements often force penetration testers to do both external as well as internal assessments. This article covers the concepts that are required to setup a pentest lab in virtual box, which looks like a real network for a small-scale organization. This can be used as a base for setting up more advanced labs to practice penetration testing concepts in a legal environment.
Before proceeding further, here is a quick note about licensing. Windows Operating Systems that we use in this article must be purchased from Microsoft or you can go with trial versions available.
Before proceeding further, here is a quick note about licensing. Windows Operating Systems that we use in this article must be purchased from Microsoft or you can go with trial versions available.
Let’s begin:
Following is the network we are going to setup in this article.
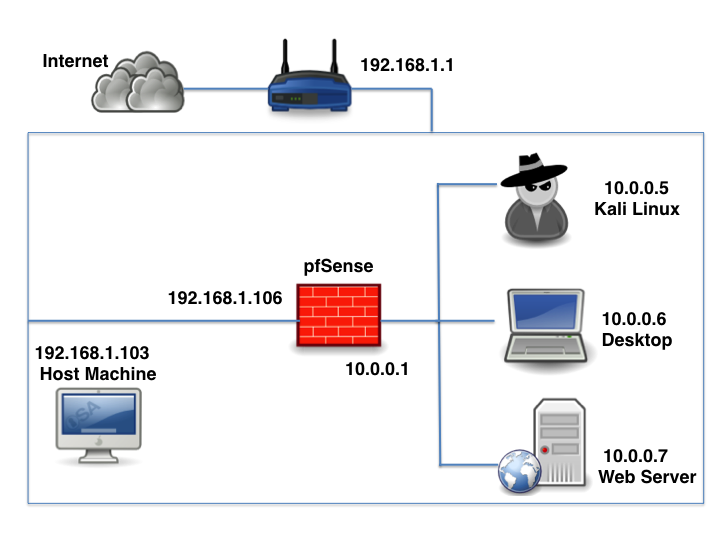
I am using Mac as host machine (192.168.1.103) and connected to a wireless router (192.168.1.1).
Required Software:
- Virtual box
- Kali Linux
- Windows Server 2003
- pfSense
- Windows 7
Virtual Box:
Install virtual box in your host machine. Virtual box can be downloaded from the link below.
Download Link: https://www.virtualbox.org/wiki/Downloads
Kali Linux:
Install Kali Linux in virtual box. Kali Linux can be downloaded from the link below.
Download Link: https://www.kali.org/downloads/
Windows Server 2003:
As mentioned in the beginning of the article, we need to get a licensed version of windows server from Microsoft.
Link: http://www.microsoft.com/en-us/download/details.aspx?id=41
The main focus of this lab is to show how we can set up the environment using pfSense. So we wont be covering how to configure windows server.
pfSense:
pfSense firewall can be downloaded from the link below.
Download Link: https://www.pfsense.org/download/
Introduction:
Note: If you want to setup a true DMZ environment in this lab, you need to setup back-to-back firewalls. To avoid this, web Server is kept in the private network.
Firewall – pfSense
Internal Pentest – Assuming that an attacker has access to the internal network, we can use Kali Linux with the IP address 10.0.0.5 to pentest the other machines in the private network.
External Pentest – Web Server is kept behind the firewall. Though firewalls cannot be used to stop web attacks since port 80/443 is opened for obvious reasons. Firewall and the private network can be assessed from users connected to the same network (Wi-Fi router) or from the host machine.
We can open ports for other vulnerable services such as FTP, SSH etc. to create more vulnerabilities for an external pentest.
Configuring pfSense:
Make sure that pfSense is installed in virtualbox.
Once after completing the installation process, we can proceed with pfSense configuration. The steps to configuring pfSense are shown in the next section. Before that, let us make changes to virtual box network settings for pfSense instance.
By default, Adapter 1 is attached to NAT in Virtual box. Change “Adapter 1” from “NAT” to “Bridged Adapter”. This is the public facing interface for pfSense.
This should look as shown in the figure below.

Now, we need to setup another interface for pfSense. This is going to be the interface for the private network protected by the firewall.
So choose “Adapter 2” and select “Internal Network”. This should look as shown in the figure below.

Now, we are done with the virtual box settings and we now need to configure pfSense. So, let us launch pfSense.

Leave it for Autoboot and you should see the following screen in a moment.

When it prompts for VLAN setup, just type “n” and hit enter.

Then, we will be asked to enter interface names for both adapters we set.
For the WAN interface, specify “le0” and for the LAN interface specify “le1” as shown in the above figure.
We can clearly observe in the note in the above figure that the internal network will be behind the NAT.
After filling the required details, hit enter.
We should see the following screen asking for the user confirmation to proceed. Just type “Y” and hit enter.

The above step creates an IP address for the WAN interface automatically. This is shown in the figure below.

As we can see in the above figure, pfSense is assigned with 192.168.1.106 on the interface le0.
This interface is publicly accessible in our lab. So, we can access this IP address from any computer connected to the same Wi-Fi network. You may look at the network diagram we have shown in the beginning to better understand this.

Now, we need to configure the other interface, which is private and not directly accessible to the public users.
To do this, we are going to setup an IP address for the interface le1.
In the above screen, just enter 2 in order to select “Assign Interfaces”. Then, we should see the available interfaces. Since we are going to configure the second interface, we will choose “2” again. This should allow us to configure the private interface, which is le1 (LAN).
We will then be prompted for the LAN IP address.
In my case, I am providing it 10.0.0.1.
All these steps explained so far are shown in the above screenshot.
Now, let us hit enter. We will be prompted for the subnet mask bit count.
Enter 24 as shown below.

Hit enter 3 times to get the screen to configure DHCP service for private LAN.

As we can see in the above figure, we need to enable DHCP server on LAN interface by typing “Y”.
Then, we need to enter the range of IP addresses. Since I am going to setup a network with only 3 systems connected to it, I am giving the range from 10.0.0.5 to 10.0.0.10
Once done, hit enter and type “Y” again to have webconfigurator for pfSense configuration from a GUI and then hit enter.

We should see the above screen with the URL where we can access the Graphical User Interface for pfSense configuration.
Finally, hit enter to go back to the command line configuration interface, which appears upon starting pfSense.

If we now observe, we should see everything set for both the interfaces.
Checking connectivity from pfSense to public users:
Now, let us see if we are able to ping the host machine.
Select “Ping host” by typing 7 in the command line as shown below.

Then enter the IP address of the host machine. We should see getting responses.
Configuring private network:
Setting up Kali Linux:
So far, we have installed and configured pfSense. Now, we are going to set up the hosts in the private network. The first host is Kali Linux. This is going to be the attacker’s machine if you want to have an internal pentesting environment.
Select kali Linux in virtual box and then network settings. “Adapter 1” is going to be “Internal Network” as shown in the following screen.

Now, boot Kali Linux.
Once it is up and running, launch a terminal and type “ifconfig” to see the IP address.

As expected, we have got 10.0.0.5 as our IP address. DHCP server at LAN interface on pfSense assigns this.
Now, we should be able to configure pfSense from this host using the URL http://10.0.0.1/
Let us open up a browser and type in http://10.0.0.1/ in the URL. We should see pfSense’s login screen as shown below.

The default username is “admin” and password is “pfsense”. Consider changing your password once after logging in for the first time.

We should see the dashboard as shown in the above figure. We can play around with various settings available in pfsense. We will see some of them in the next section.
Getting Internet in internal network:
By default, we wont get the Internet in our private network. Just to test, we can try pinging google.com as shown in the figure below.

As expected, it says “unknown host”.
Now, login to the pfSense web interface and navigate to Services -> DHCP Server.
Find out the section ‘DNS Servers” and type the following address as shown in the figure below.
8.8.8.8

Make sure that you save the changes in the configuration.
Now, type “dhclient” in the terminal and try pinging google.com as shown in the figure below.

As we can see, we are getting responses from google.com.
Let us also check the address of the default gateway for this host by typing the command “netstat –nr” as shown below.

As we expected, this is 10.0.0.1, which is the IP address we assigned to le1 interface on pfSense.
Setting up windows server:
Finally, install windows server 2003. As I mentioned in the beginning of this article, the main focus of this lab is to show how we can set up the environment using pfSense. So we wont be covering how to configure windows server and domains here.
Again, the network settings will remain same for this host.

Start this virtual machine instance and check the IP address as shown below.

I am running IIS webserver on this machine. But, unfortunately we can’t access this server from outside this network.
This is where we can port forward and allow users to access this webserver through the firewall.
Configuring pfSense to forward http traffic to internal network.
Log in to pfSense web interface using the browser. Navigate to
Port Forwarding –> NAT rule and make sure that you nave the same settings as I have here in the following screenshot.

The next step is to unblock connections to private network from public users. To do this, navigate to the following path.
Interfaces -> WAN -> Block Private networks.
Make sure that it is unchecked as shown below.

Save the changes.
Now, we should be able to access the internal web server just by typing the public interface IP address of pfSense as shown below.

Setting up windows 7:
Similar to how we set up Kali Linux, we need to setup Windows 7’s network settings to “Internal Network” and you are good to go.
This looks as shown in the figure below.

A quick note on setting up lab for pivoting:
If you want to practice pivoting in this pentest lab, you may change windows 7’s network settings from internal to “host only adapter” on “Adapter 1”. Then enable “Adapater 2” on server 2003 and make it “Host only Adapter”. You should now see an additional IP address on server 2003.
Compromise Server 2003 and use it as a pivot point to gain access to windows 7.
Conclusion:
This article has provided a step by step procedure to setup a lab for practicing/teaching penetration testing in a legal environment.
This article can be used as a base if you want to expand your lab to have more advanced setup such as installing Web Application Firewalls, Load Balancers etc.
Filed Under: Blog , Tutorials


 John is a Cyber Security Enthusiast, Infosec researcher and a blogger.
 Srinivas is a Cyber Security Enthusiast, Infosec researcher and a part time blogger.
0 comments : Post Yours! Read Comment Policy ▼
PLEASE NOTE:
We have Zero Tolerance to Spam. Chessy Comments and Comments with Links will be deleted immediately upon our review.